SPIRAL PERM TUTORIAL - Done EASY! but looks FABULOUS!!
YOU CAN CLICK ON EACH PICTURE TO VIEW THEM FULL SIZE!

Well You can do a spiral perm on a doll with MINIMAL tools but MAXIMUM results and I can show you how to do it in only a few easy steps.
First lets list the tools/supplies you will need,
#1 a Doll with fairly LONG hair that can be wrapped around the straws fairly easily and still hang at least to the waist or mid back to look effective.
#2 PLAIN ordinary DRINKING STRAWS
#3 Clear Elastic silicone bands, you can find these in any drug store such as WalGreens or Walmart etc etc.
#4 straight sewing pins
#5 bobby pins
#6 small "end papers" made from plastic grocery bags, make these about 3in x 3in is a good size for them
#7 a pan of boiling water in which to dunk the dolls head after rolling and deep enough to completely cover the rolled areas
Now LETS get started, First you will want to decide EXACTLY HOW many spirals you want and in what direction you want them rolled, this step is UBER important in boil perming ANY dolls hair as the curls will lay in the direction you roll them up in and we dont want our girls to have messy hair when we are thru.
With BOTH of the dolls shown I decided to do a pretty straight forward ponytail and spiral curl on that, ON the Antoinette doll its exactly that a simple ponytail that had the individual ponytail divided into like 7-8 seperate rolled straws.
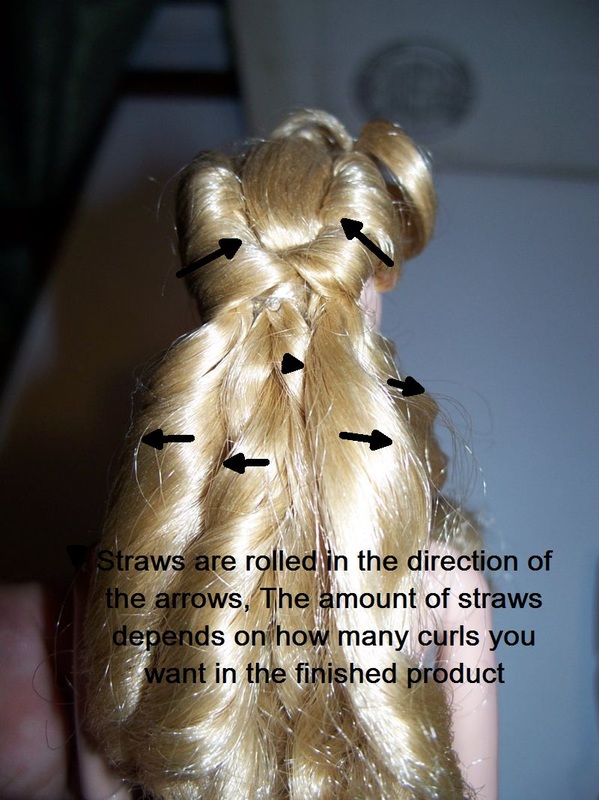
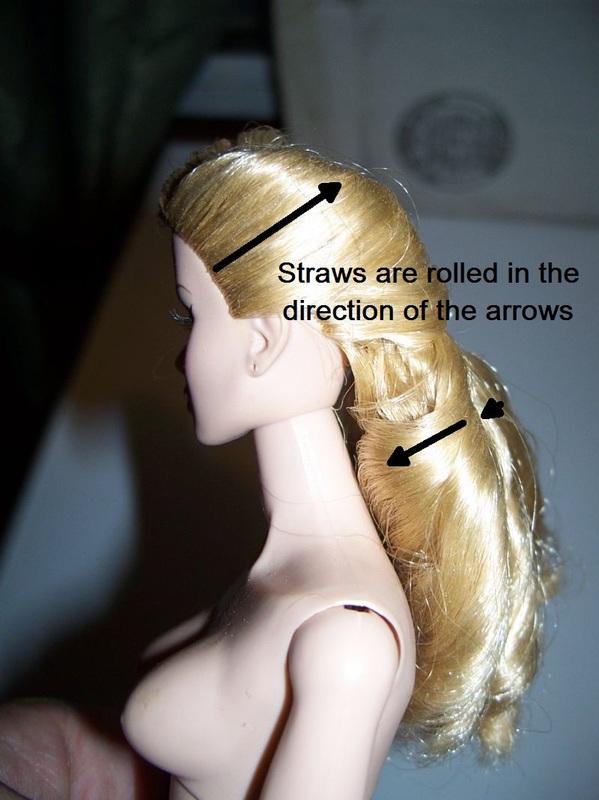
IN these directions the DIRECTION for all straws is plainly shown in the direction i rolled each and every one in.
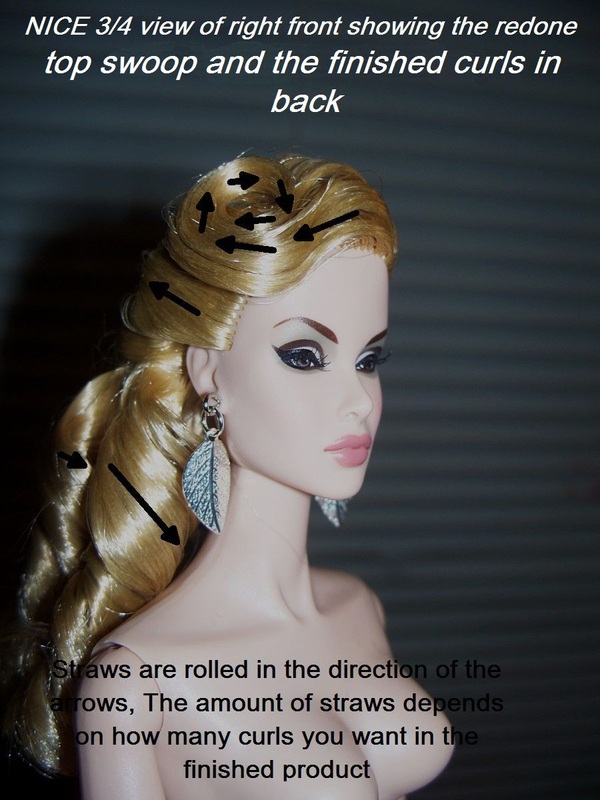
With the Blonde Fashion Royalty doll the hairdo shown is a BIT more complicated but I will explain in further detail as we go along.
But FIRST I shall show you the pics of the Antoinette Tonner doll and the simplicity in which this can be done.
First lets list the tools/supplies you will need,
#1 a Doll with fairly LONG hair that can be wrapped around the straws fairly easily and still hang at least to the waist or mid back to look effective.
#2 PLAIN ordinary DRINKING STRAWS
#3 Clear Elastic silicone bands, you can find these in any drug store such as WalGreens or Walmart etc etc.
#4 straight sewing pins
#5 bobby pins
#6 small "end papers" made from plastic grocery bags, make these about 3in x 3in is a good size for them
#7 a pan of boiling water in which to dunk the dolls head after rolling and deep enough to completely cover the rolled areas
Now LETS get started, First you will want to decide EXACTLY HOW many spirals you want and in what direction you want them rolled, this step is UBER important in boil perming ANY dolls hair as the curls will lay in the direction you roll them up in and we dont want our girls to have messy hair when we are thru.
With BOTH of the dolls shown I decided to do a pretty straight forward ponytail and spiral curl on that, ON the Antoinette doll its exactly that a simple ponytail that had the individual ponytail divided into like 7-8 seperate rolled straws.
IN these directions the DIRECTION for all straws is plainly shown in the direction i rolled each and every one in.
With the Blonde Fashion Royalty doll the hairdo shown is a BIT more complicated but I will explain in further detail as we go along.
But FIRST I shall show you the pics of the Antoinette Tonner doll and the simplicity in which this can be done.
 |
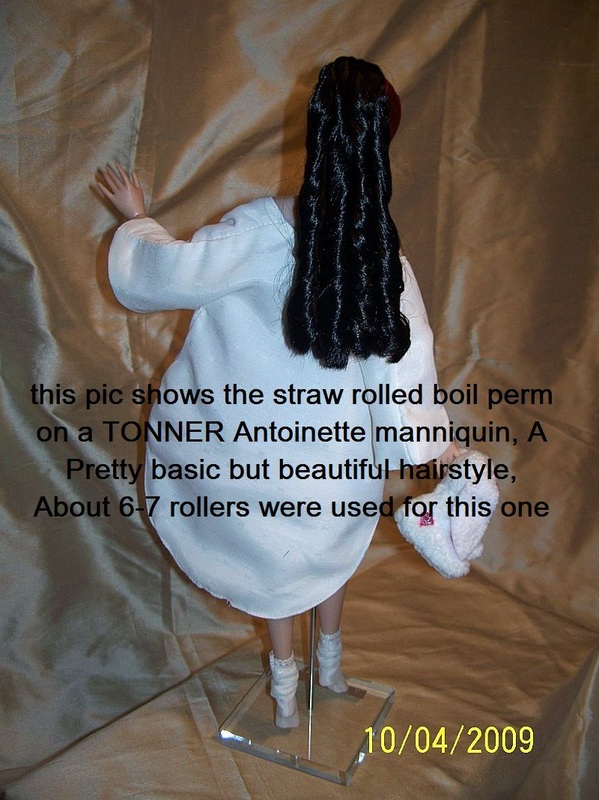 |
as you can see in the above pics the doll has approximately 7 rolled up straws in the final product, IN looking at the picture of the direct BACK view you can see 4 spirals, these are rolled towards the FRONT of the doll, In the following pictures you will get DETAILED instructions on the direct of each and every straw.
For the Fashion royalty doll I used 5 straws on the back ponytail, ON this style on each side you comb a small amount of hair on each side of the head forward and leave them be for the minute, YOU will then make the ponytail in the back
and we will roll our straws as above on each side and if you have an odd number you can judge which direction you want to roll the last roller.
OK lets decide on the number of spirals we want as I said in my case with this one I wanted FIVE of them, so lets divide the hair into five sections, you can do this one at a time but VISUALLY divide the hair ponytail into the decided upon
number of spirals and we shall start with the outer most spiral on EITHER SIDE.
So lets grab ONE end paper and comb our section of hair out straight, making sure its soaked good to ensure a good roll, and we start rolling from the TOP of the straw and work our way DOWN the straw until we run out of rolled hair, then while holding each straw you will want to insert a STRAIGHT PIN into the TOP of each straw DIRECTLY into the dolls head, Not to worry this will NOT hurt the doll at all, when you do this you will want to see if the hair comes exactly to the end of our straws and if not please at this time cut the end of the straw at then end of where your rolled hair ends, then take ONE bobby pin and put it thru the end of the straw until fully inserted and covering the end of the rolled hair. Continue doing this for the remaining number of spirals, Now with this particular FASHION ROYALTY doll i used the hair we combed forward to each side of the head comes into play, Take these sections one at a time and ROLL them
BACKWARDS to the head NO ROLLERS ARE NEEDED FOR THIS STEP!!, preferably at the center of the pony tail, or as close as you can, if you have a small amount at the end of the roll you can roll this under and pin the roll again directly to the head, WE will LEAVE THESE PINS IN for this hair
style.
Then onto the top curl on the doll, I wet the original HIGH curl down so it could be flattened to the head a bit and gave it a slight swoop to the front and then curled it into a small curl and use a BOBBY PIN to hold it to the head.
AT this point we should be ready for the DUNKING of the head into our pot of boiling water, You want to make sure at this point again BEFORE we dunk that all curls are in the places you want them, SMALL amounts of hair can always
be trimmed out after the boil if they are exposed.
Now take your doll to the pan and dunk the head into the water, Now you will get various TIMES from as MANY people on HOW LONG to DUNK the head into the boiling water, anywhere from 30 seconds up to 2 FULL MINUTES, I tend to
err on the side of caution and go a FULL 1 minute and 30 seconds and this amount of time is usually sufficient to get maximum curls on ANY dolls.
When our total time has elapsed in the boiling water you will want to hold the doll upright and hold the freshly boiled hair under running COLD tap water.
You can at this point leave the doll to sit and dry the hair as little or as much as you want to, I tend to sit a freshly permed doll in front of a fan for at least an hour and then I can work with the hair a bit.
Now onto the FINALE, take the bobby pin on the curl in front out at this point and you should have a perfectly formed small spitcurl on the one side, THEN we proceed to the back spirals, You can take all STRAIGHT PINS out at this point, if they are difficult take a small needle nose plyers and pull then out being careful with the spirals, proceed to the bottom of each curl and remove the bobby pins we used to hold the hair onto the straws and remove all of these.
AGAIN CAREFULLY.
Now at this point we can carefully pull the straws out from the bottom of the curl and remove completely, The "endpapers" will still be in the hair but you can carefully remove these so as not to disturb each curl until they have
dryed completely. You can now arrange the hair a bit to place each curl where
you want the final placement and VOILA you have just completed a spiral boil perm on your doll!
If they are not to your liking you can go back to the beginning and redo it, being CAREFUL with each step.
I would LOVE to see pics of your dolls if you choose to use my tutorial.
  |
  |
